언리얼 게임 프레임워크
기본적으로 게임을 만들기 위해서는 시스템이 어떻게 구성 되어있는지 알 필요가 있다.
언리얼에서는 게임을 만들때 공통적으로 사용되는 시스템을 정리해서 하나의 프레임 워크로 제작해놓았다.
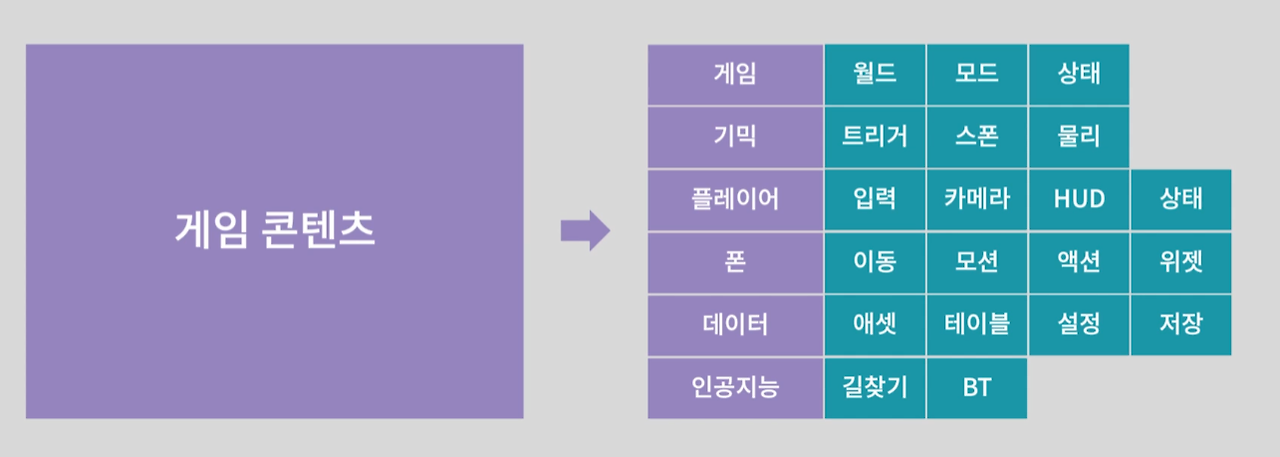
이렇게 만들어진 프레임워크를 가져다가 세공하는 형식으로 게임을 제작한다.
월드
월드는 게임 컨텐츠를 담기 위해 제공되는 가상의 공간을 의미한다.
특별한 오브젝트인데, 시간, 트랜스폼, 틱등 예약된 컴포넌트에 다양한 서비스를 제공한다.
월드 세팀 이라는 환경설정을 통해 컨텐츠 제작을 할 수 있다.
월드 내부에서의 서비스르 바탕으로 동작하는 오브젝트들을 액터 라고 부른다.
GameMode
게임 규칙을 지정하고 게임을 판정하는 최고 관리자 액터이다. 무형으로 존재한다.
언리얼 엔진에서는 하나의 게임에는 반드시 하나의 게임 모드만 존재해야한다.
게임 모드는 입장할 사용자의 규격을 지정하고, 멀티플레이어 게임에서 판정을 처리한다 던지 등 다양한 게임 심판인 셈이다.
기믹
게임 진행을 위한 이벤트를 발생시키는 사물 액터이다.
주로 이벤트 발생을 위한 충돌 영역을 설정하는데, 이를 트리거라고 한다.
이 때 트리거를 이용해서 캐릭터와 상호 작용하고, 월드에 액터를 스폰해서 컨텐츠를 전개 하는 식으로 사용한다.
플레이어
게임에 입장한 사용자 액터이다. 이 역시 무형으로 존재한다. 그러면 의문이 드는데 우리가 움직이는 건 대체 뭘까? 이는 밑에서 기술하겠다.
게임 모드의 로그인을 통해서(접속하면) 사용자가 게임 월드에 입장하게 되면 플레이어가 생성된다.
싱글 플레이 게임세어는 0번 플레이어가 설정 된다는 것이다.
플레이하는 유저와 최종 커뮤니케이션을 담당하는 역할이다. 커뮤니케이션이라고 한다면, 입력, 카메라, UI 등등을 의미한다.
게임과 게임 모드는 1:1 관계 인 것과 같이 플레이어와 유저도 역시 1:1의 관계이다.
폰
체스에서 사용하는 폰 말 그대로 이다.
유저가 플러이어의 입력을 통해 게임 내부 상에 존재하는 폰을 움직이게 할 수 있다는 것이다.
입력을 통해 조종한다 라는 개념은 하나의 폰에 빙의한다는 개념으로 접근하는 것이 좋다.
빙의 당하는 액터가 폰 인 셈이다.
길찾기도 하고 상호작용도 가능하다. 그런데 체스에서도 여러 기물들이 있듯이 언리얼 에서는 인간 형태의 폰을 따로 "캐릭터" 라는 클래스로 따로 정의 해놓았다.
GameMode, Player, Character 클래스 생성
GmaeMode 클래스부터 만들어보자.
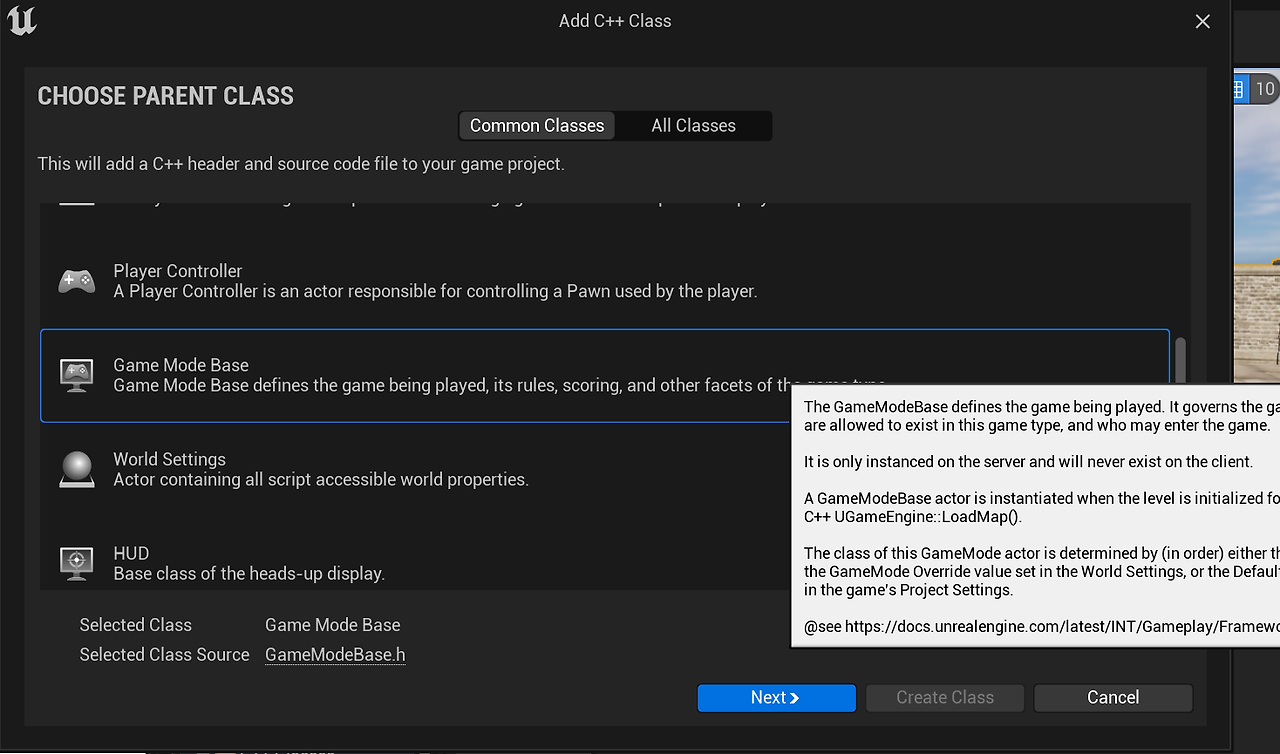
GameModeBase를 상속받으면 된다. 나머지 클래스들도 찾아서 생성해준다.
그리고 월드 세팅에서 방금 만든 GameMode를 넣어주면 아래처럼 기본 세팅으로 설정되어 있다.
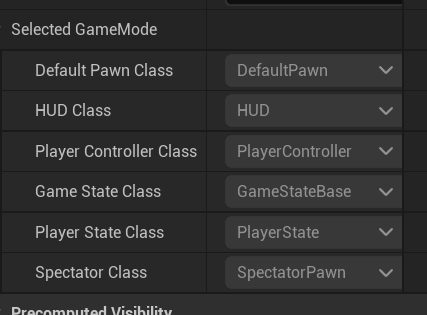
이 값을 세팅해주기 위해 GameMode cpp 파일에서 static ConstructorHelpers를 통해 값을 채줘우자.
AABGameModeBase::AABGameModeBase() {
	static ConstructorHelpers::FClassFinder<APawn> ThirdPersonClassRef(TEXT("/Game/ThirdPerson/Blueprints/BP_ThirdPersonCharacter.BP_ThirdPersonCharacter_C"));
	if (ThirdPersonClassRef.Class) {
		DefaultPawnClass = ThirdPersonClassRef.Class;
	}
 	PlayerControllerClass = AABPlayerController::StaticClass();
}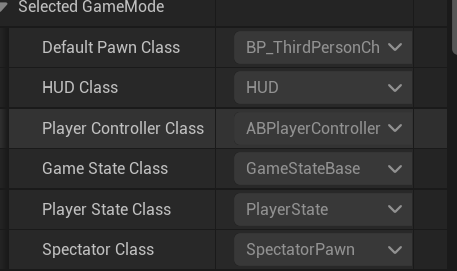
실행하면 아래와 같이 잘 작동한다.
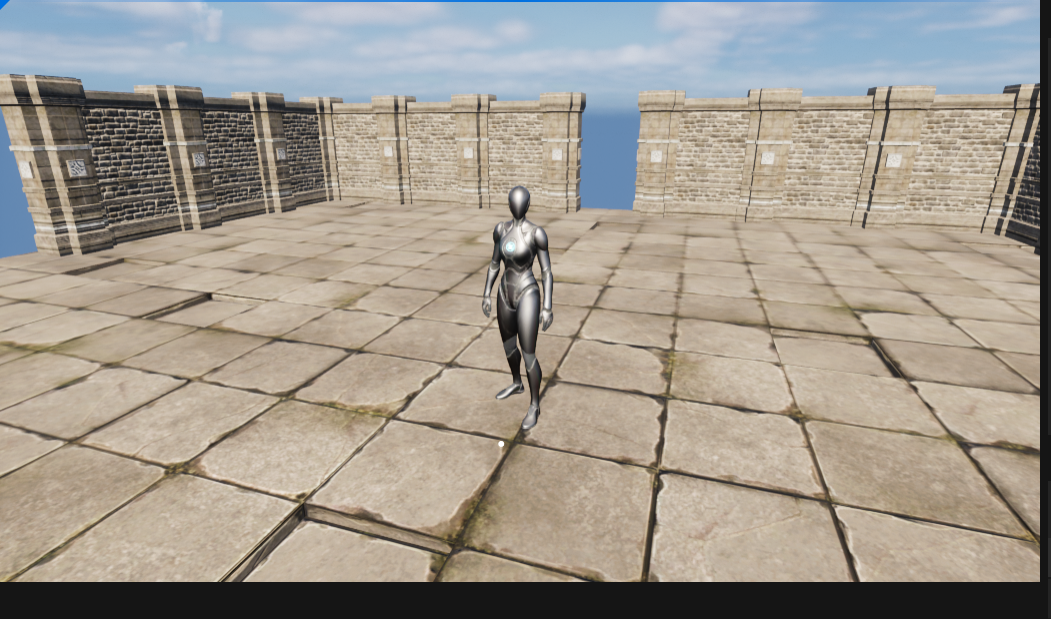
게임 모드에서 헤더를 포함하지 않게하기
게임을 제작하는데 있어 다른 폴더에 있든 헤더를 웬만하면 참조하지 않는 방향으로 흘러가야한다. 지금은 AABPlayerController 헤더를 include하고 있기에 이를 수정해주어야한다.
스크립트도 자신만의 고유 경로가 존재하기에 FClassFinder를 통해 찾아올 수 있다.
AABGameModeBase::AABGameModeBase() {
	static ConstructorHelpers::FClassFinder<APawn> ThirdPersonClassRef(TEXT("/Game/ThirdPerson/Blueprints/BP_ThirdPersonCharacter.BP_ThirdPersonCharacter_C"));
	if (ThirdPersonClassRef.Class) {
		DefaultPawnClass = ThirdPersonClassRef.Class;
	}
	static ConstructorHelpers::FClassFinder<APlayerController> ControllerClassRef(TEXT("/Script/ArenaBattle.ABPlayerController"));
	if (ControllerClassRef.Class) {
		PlayerControllerClass = ControllerClassRef.Class;
	}
}액터 제작
월드에 속한 컨텐츠 단위를 액터라고 불렀는데 액터는 트랜스폼을 가지고 틱과 시간 서비스를 제공한다. 하지만 액터는 논리적인 개념일 뿐, 단순히 컴포넌트를 감싸는 박스이다.
따라서, 실제적인 기능을 액터가 하기 보다는 가지고 잇는 컴포넌트가 주로 진행하게 된다.
액터의 역할은 컴포넌트를 관리하는 것. 일반적으로 루트 컴포넌트를 기반으로 트리 형태로 컴포넌트를 가진다.
BP Class로 액터 만들기
빈 BPClass를 생성하면 다음과 같다.
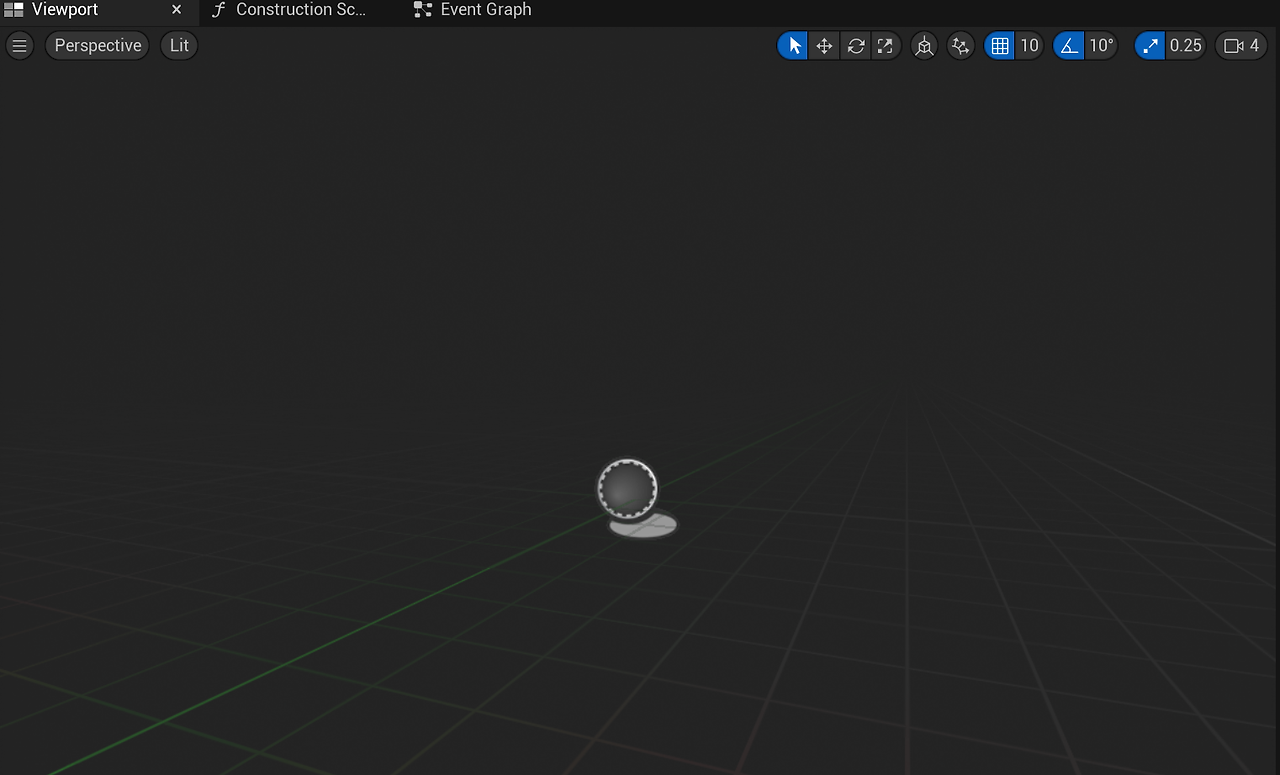
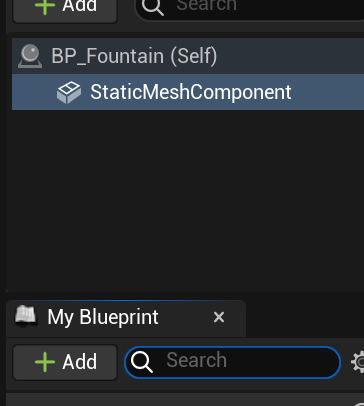
분수대를 만들기 위해 StaticMesh를 붙여줘야한다.
여기에 이제 Mesh를 분수대로 설정해주고 물도 추가해주면 이렇게 완성이 된다.
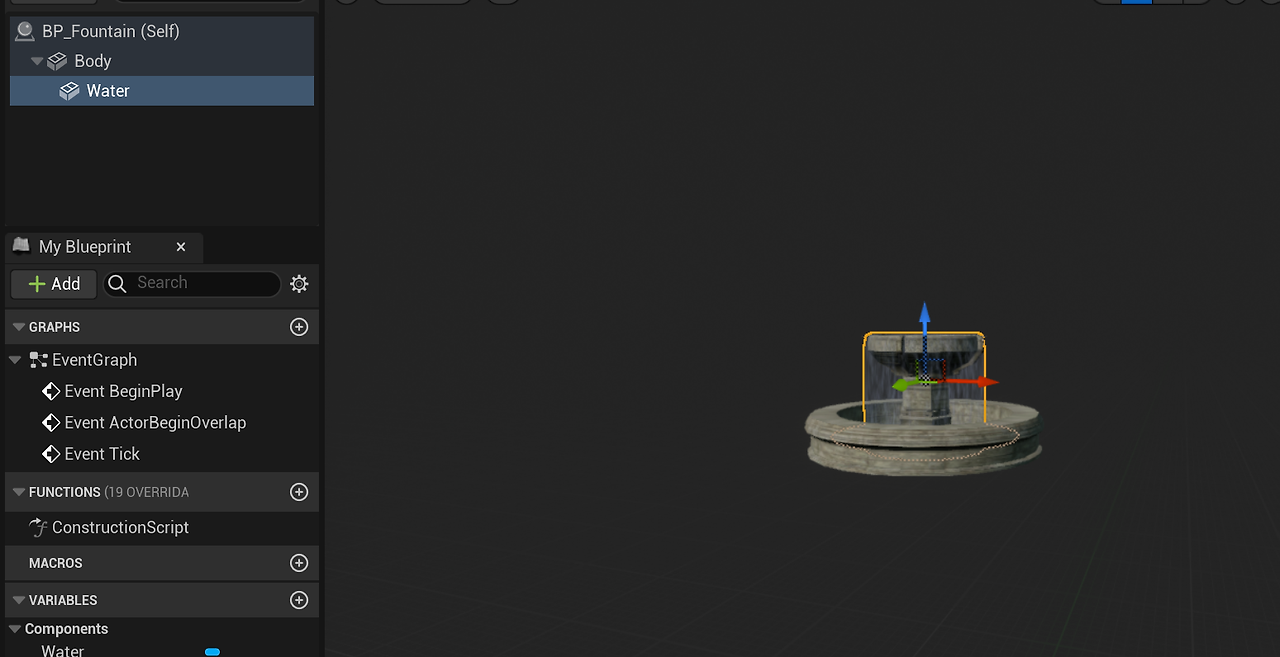
이렇게 BP를 통해 제작하면 매우 쉽게 액터를 제작할 수 있다.
다만 C++을 사용하면 더 자세히 그리고 정밀하게 관리할 수 있기 때문에 이를 C++을 통해 제작해보자.
C++로 액터 만들기
- 컴포넌트는 언리얼 오브젝트이므로 UPROPERTY를 설정하고 TObjectPtr로 포인터 설정한다.언리얼 5 부터 달라진 규칙(GC의 관리를 받기 위한 목적을 가지고 있음)
- 컴포넌트의 등록
- CDO에서 생성한 컴포넌트는 자동으로 월드에 등록된다.
- NewObject로 생성한 컴포넌트는 반드시 등록절차를 거쳐야 한다. ( 예시로) RegisterComponent)
- 등록된 컴포넌트만 월드의 기능을 사용할 수 있음. 물리와 렌더링 처리에 합류.
- 컴포넌트의 확장 설계
- 에디터 편집 및 블루프린트로의 승계를 위한 설정
- UPROPERTY에 지정자를 설정할 수 있다.
- 컴포넌트 지정자.
- Visible / Edit = 크게 객체타입과 값타입으로 사용하는 방법 (컴포넌트는 Visible)
- Anywhere / DefaultsOnly/ InstanceOnly : 에디터에서 편집 가능 영역
- BlueprintReadOnly / BlueprintReadWrite : 블루프린트로 확장시 읽기 혹은 읽기쓰기 권한 부여.
- Category : 에디터 편집 영역에서의 카테고리 지정.
이제 이 방식을 이용해서 분수대를 만들어보자.
UPROPERTY(VisibleAnywhere, BlueprintReadWrite, category = Mesh)
TObjectPtr<class UStaticMeshComponent> Body;

UPROPERTY(VisibleAnywhere, BlueprintReadWrite, category = Water)
TObjectPtr<class UStaticMeshComponent> Water;
이 말이 즉슨, 지금 객제이기 때문에 Visible로 설정이 되며 에디터에서 편집을 가능하게 할 것임.
블루프린트에서 확장을 하게 된다면 읽고 쓰기가 가능하게 만들 것이라는 것.여기에서 지정한 컴포넌트들을 생성자, 즉 CDO에서 만들어줘야 한다.
AABFountain::AABFountain()
{
	// Set this actor to call Tick() every frame.  You can turn this off to improve performance if you don't need it.
	PrimaryActorTick.bCanEverTick = true;

	Body = CreateDefaultSubobject<UStaticMeshComponent>(TEXT("Body"));
	Water = CreateDefaultSubobject<UStaticMeshComponent>(TEXT("Water"));

	RootComponent = Body;
	Water->SetupAttachment(Body);
	Water->SetRelativeLocation(FVector(0.0f, 0.0f, 132.0f));

	static ConstructorHelpers::FObjectFinder<UStaticMesh> BodyMeshRef(TEXT());
	if (BodyMeshRef.Object) {
		Body->SetStaticMesh(BodyMeshRef.Object);
	}

	static ConstructorHelpers::FObjectFinder<UStaticMesh> WaterMeshRef(TEXT());
	if (WaterMeshRef.Object) {
		Water->SetStaticMesh(WaterMeshRef.Object);
	}
}C++과 BP로 만든걸 비교해보면 정확히 동일한 것을 확인할 수 있다.
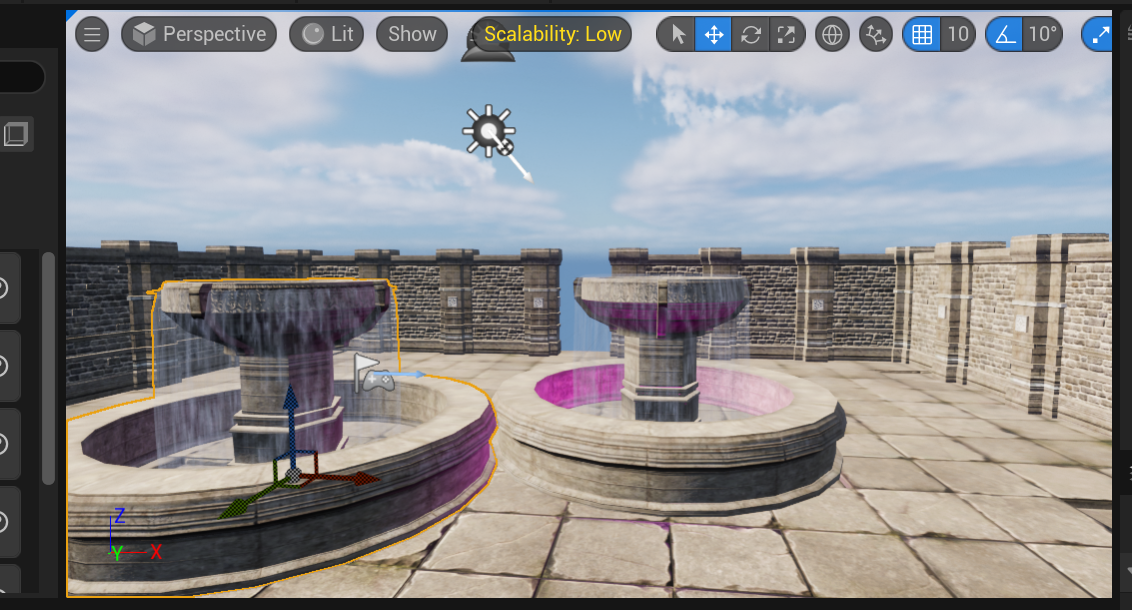
캐릭터를 C++로 생성하기
폰 : 액터를 상속받은 특별한 액터를 의미한다.
특별한 기능
- 플레이어가 빙의해서 입출력을 설정한다
- 폰은 길찾기를 사용할 수 있음.
- 기믹과 상호작용을 담당하는 충돌 컴포넌트
- 시각적인 비주얼을 담당하는 메시 컴포넌트
- 움직임을 담당하는 컴포넌트
- 컴포넌트 중에서 트랜스폼이 없이 기능만 제공하는 컴포넌트를 액터 컴포넌트라고 한다.
- 트랜스폼이 있으면 씬 컴포넌트라고 함.
일반적으로 기믹과 상호작용을 하는 충돌 컴포넌트가 루트 컴포넌트가 된다.
캐릭터의 기본구조는 다음과 같다.
- 기믹과 상호작용하는 캡슐 컴포넌트
- 비쥬얼적으로 보여줄 수 있는 스켈레탈 메시 컴포넌트
- 캐릭터 무브먼트 컴포넌트 (움직임과 연관성이 높음)
이런 캐릭터 클래스를 상속받은 AABCharacterBase의 생성자에서 초기화 해주면 된다.
AABCharacterBase::AABCharacterBase() {

	// Don't rotate when the controller rotates. Let that just affect the camera.
	bUseControllerRotationPitch = false;
	bUseControllerRotationYaw = false;
	bUseControllerRotationRoll = false;

	// Set size for collision capsule
	GetCapsuleComponent()->InitCapsuleSize(42.f, 96.0f);
	GetCapsuleComponent()->SetCollisionProfileName(TEXT("Pawn"));

	GetCharacterMovement()->bOrientRotationToMovement = true; // Character moves in the direction of input...
	GetCharacterMovement()->RotationRate = FRotator(0.0f, 500.0f, 0.0f); // ...at this rotation rate
	GetCharacterMovement()->JumpZVelocity = 700.f;
	GetCharacterMovement()->AirControl = 0.35f;
	GetCharacterMovement()->MaxWalkSpeed = 500.f;
	GetCharacterMovement()->MinAnalogWalkSpeed = 20.f;
	GetCharacterMovement()->BrakingDecelerationWalking = 2000.f;

	GetMesh()->SetRelativeLocationAndRotation(FVector(0.0f, 0.0f, -100.0f), FRotator(0.0f, -90.0f, 0.0f));
	GetMesh()->SetAnimationMode(EAnimationMode::AnimationBlueprint);
	GetMesh()->SetCollisionProfileName(TEXT("CharacterMesh"));

	static ConstructorHelpers::FObjectFinder<USkeletalMesh> CharacterSkeletalMesh(TEXT("/Game/Characters/Mannequins/Meshes/SKM_Quinn.SKM_Quinn"));
	if (CharacterSkeletalMesh.Object)
	{
		GetMesh()->SetSkeletalMesh(CharacterSkeletalMesh.Object);
	}

	static ConstructorHelpers::FClassFinder<UAnimInstance> AnimInstanceRef(TEXT("/Game/Characters/Mannequins/Animations/ABP_Quinn.ABP_Quinn_C"));
	if (AnimInstanceRef.Class)
	{
		GetMesh()->SetAnimInstanceClass(AnimInstanceRef.Class);
	}

}
코드만 봐도 어떤 역할을 했는지 금방 알 수 있다. 움직임, 충돌, 메시, 애니메이션 등을 값을 채워준 것이다.
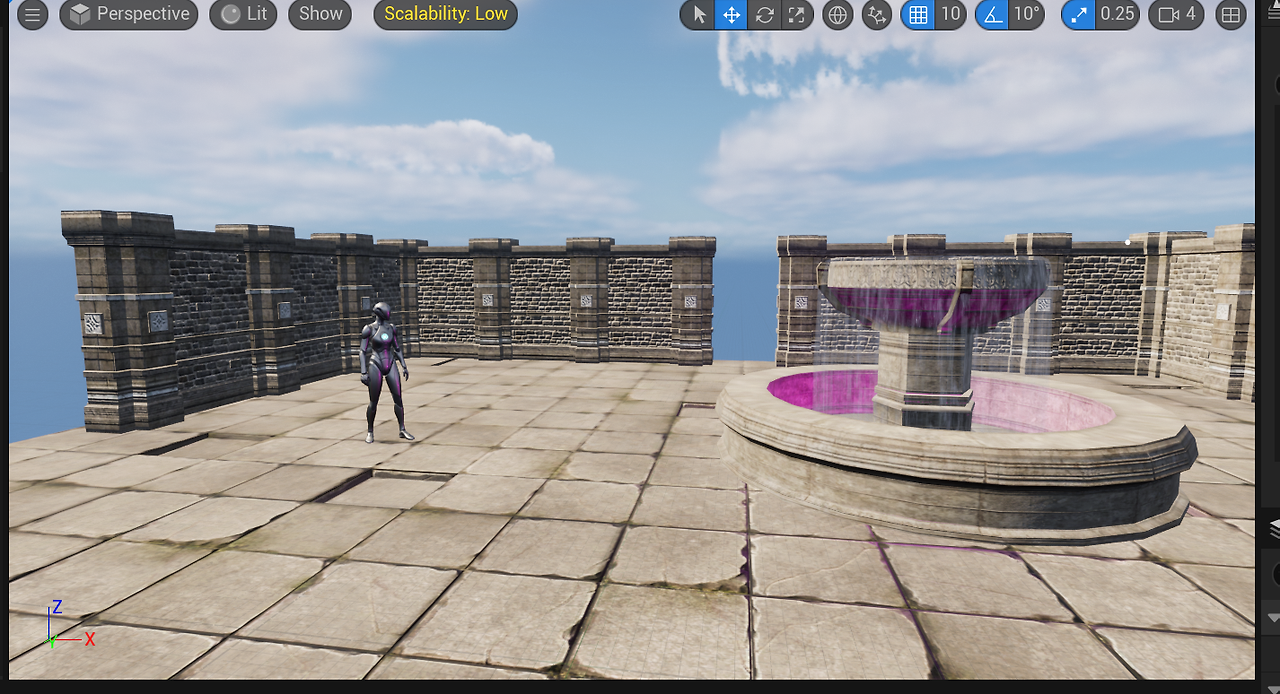
카메라를 제장해서 플레이어를 Follow하게 해야하는데 카메라는 캐릭터에 따로 붙는게 아니라 플레이어만 가지고 있어야한다. 그래서 AABCharacterBase를 상속한 AABCharacterPalyer에서 카메라를 만들어준다.
AABCharacterPlayer::AABCharacterPlayer()
{
	CameraBoom = CreateDefaultSubobject<USpringArmComponent>(TEXT("CameraBoom"));
	CameraBoom->SetupAttachment(RootComponent);
	CameraBoom->TargetArmLength = 400.0f; // The camera follows at this distance behind the character
	CameraBoom->bUsePawnControlRotation = true; // Rotate the arm based on the controller

	FollowCamera = CreateDefaultSubobject<UCameraComponent>(TEXT("FollowCamera"));
	FollowCamera->SetupAttachment(CameraBoom, USpringArmComponent::SocketName); // Attach the camera to the end of the boom and let the boom adjust to match the controller orientation
	FollowCamera->bUsePawnControlRotation = false;
//여기에 이름을 붙일 때 소켓으로 붙임. Spring Arm 끝에 붙는 것임.
}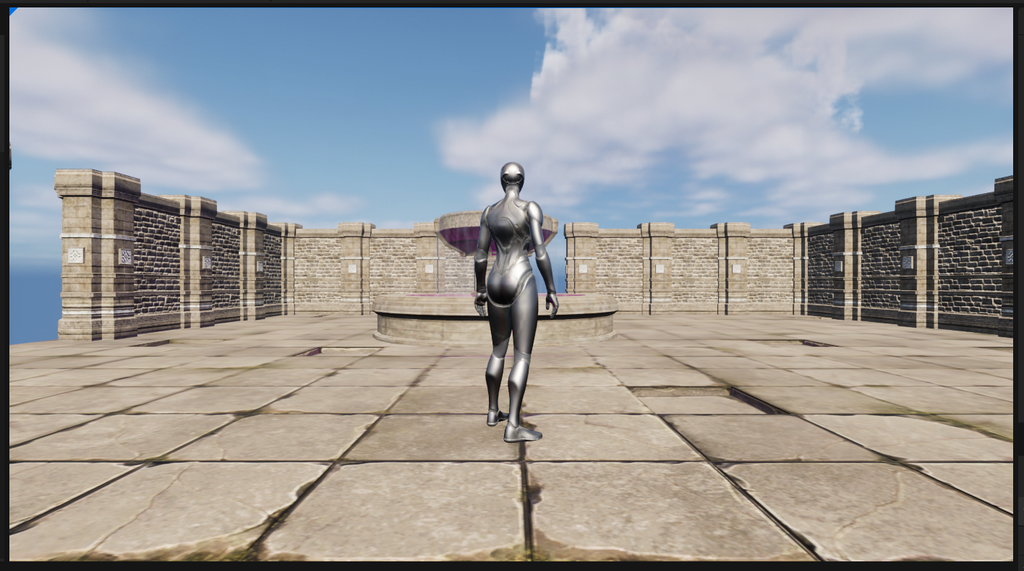
이렇게 플레이어를 바라보는 카메라를 카메라 암을 통해서 제작할 수 있다.
입력 시스템
플레이어의 입력은 컨트롤러를 통해 폰으로 전달된다.
입력을 컨트롤러가 처리할 수도 폰이 처리할 수도 있지만 일반적으로 폰이 처리하는 방식을 사용한다.
게임 내부에 캐릭터가 있다면 그런 방식을 이용하고 없다면 컨트롤러에서 처리하는 방식이다.
그런 이유를 가지는 건 명확하다. GTA 같은 게임을 플레이 해보면 걸어다닐 때도 있고 차를 타고 움직일 때가 있다. 걸어다닐때 Pawn과 차 Pawn에서 각각의 움직임을 구현하면 편하지만 컨트롤러에서 이 두가지를 전부 처리하기엔 리스크가 너무 크기 때문이다.
언리얼 5.1부터는 입력시스템이 향상되었다. 사용자의 입력 설정 변경에 유연하게 대처할 수 있도록 구조가 재수립 된것이다.
사용자 입력 처리를 네 단계로 세분화하고 각 설정 독립적인 에셋으로 대체했다.
사용자의 입력을 분리하고 이를 독립적인 에셋으로 인정하겠다는 의미이다. 에셋을 분리하면 상황에 대한 대응이 유연해지기 때문이다.
향상된 입력시스템 동작 구성

사용자와 입력데이터를 최종 함수에 매핑하는 과정을 체계적으로 구성하는 방식이다.
액션에 사용자의 입력을 매핑하는 느낌? 들어온 입력값에 대해서 들어온 입력값을 기반으로 이벤트를 활성화 하면 그 이벤트와 연결된 함수를 호출하는 것이다.
복잡해보이지만 이는 플랫폼에 따른 다양한 입력장치를 설정할 수 있게 만든다.
C++로 입력 처리하기
일단 코드는 CharacterPlayer 코드에 넣는다.
/** MappingContext */
UPROPERTY(EditAnywhere, BlueprintReadOnly, Category = Input, meta = (AllowPrivateAccess = "true"))
TObjectPtr<class UInputMappingContext> DefaultMappingContext;

/** Jump Input Action */
UPROPERTY(EditAnywhere, BlueprintReadOnly, Category = Input, meta = (AllowPrivateAccess = "true"))
TObjectPtr<class UInputAction> JumpAction;

/** Move Input Action */
UPROPERTY(EditAnywhere, BlueprintReadOnly, Category = Input, meta = (AllowPrivateAccess = "true"))
TObjectPtr<class UInputAction> MoveAction;

/** Look Input Action */
UPROPERTY(EditAnywhere, BlueprintReadOnly, Category = Input, meta = (AllowPrivateAccess = "true"))
TObjectPtr<class UInputAction> LookAction;

void Move(const FInputActionValue& Value);
void Look(const FInputActionValue& Value);input에 따라서 매핑을 해주는 MappingContext에 따라서 함수를 바인드 해주면 된다.
BeginPlay에서는 매핑 컨텍스트를 할당하는 역할을.
SetupPlayerInputComponent는 Input 시스템에서 액션과 함수를 매핑해주는 역할을 한다.
AABCharacterPlayer::AABCharacterPlayer()
{
	CameraBoom = CreateDefaultSubobject<USpringArmComponent>(TEXT("CameraBoom"));
	CameraBoom->SetupAttachment(RootComponent);
	CameraBoom->TargetArmLength = 400.0f; // The camera follows at this distance behind the character
	CameraBoom->bUsePawnControlRotation = true; // Rotate the arm based on the controller

	FollowCamera = CreateDefaultSubobject<UCameraComponent>(TEXT("FollowCamera"));
	FollowCamera->SetupAttachment(CameraBoom, USpringArmComponent::SocketName); // Attach the camera to the end of the boom and let the boom adjust to match the controller orientation
	FollowCamera->bUsePawnControlRotation = false;

	static ConstructorHelpers::FObjectFinder<UInputMappingContext> MappingContext(TEXT("/Game/ThirdPerson/Input/Actions/IA_Jump.IA_Jump"));
	if (MappingContext.Object) {
		DefaultMappingContext = MappingContext.Object;
	}
	static ConstructorHelpers::FObjectFinder<UInputAction> JUMPACTION(TEXT("/Game/ThirdPerson/Input/Actions/IA_Jump.IA_Jump"));
	if (JUMPACTION.Object) {
		JumpAction = JUMPACTION.Object;
	}

	static ConstructorHelpers::FObjectFinder<UInputAction> MOVEACTION(TEXT("/Game/ThirdPerson/Input/Actions/IA_Move.IA_Move"));
	if (MOVEACTION.Object) {
		MoveAction = MOVEACTION.Object;
	}

	static ConstructorHelpers::FObjectFinder<UInputAction> LOOKACTION(TEXT("/Game/ThirdPerson/Input/Actions/IA_Look.IA_LooK"));
	if (LOOKACTION.Object) {
		LookAction = LOOKACTION.Object;
	}
}
이제 Enhanced Input만 사용할 수 있게끔 만들기 위해서
CastChecked를 이용해 자체적으로 만족을 못하면 터지게 만든다.
void AABCharacterPlayer::SetupPlayerInputComponent(class UInputComponent* PlayerInputComponent) {

	// Set up action bindings
	if (UEnhancedInputComponent* EnhancedInputComponent = CastChecked<UEnhancedInputComponent>(PlayerInputComponent)) {
		//이후에 바인드를 하면서 Action에 따른 함수를 넣어주는 모습!
		//Jumping
		EnhancedInputComponent->BindAction(JumpAction, ETriggerEvent::Triggered, this, &ACharacter::Jump);
		EnhancedInputComponent->BindAction(JumpAction, ETriggerEvent::Completed, this, &ACharacter::StopJumping);

		//Moving
		EnhancedInputComponent->BindAction(MoveAction, ETriggerEvent::Triggered, this, &AABCharacterPlayer::Move);

		//Looking
		EnhancedInputComponent->BindAction(LookAction, ETriggerEvent::Triggered, this, &AABCharacterPlayer::Look);

	}

}
//여기서는 플레이어의 컨트롤러의 여부는 판단하고, 이제 SubSystem을 적용하는데,
//이 때 겹칠경우에 대비해서 우선순위 기반으로 등록을 해놓는다.
void AABCharacterPlayer::BeginPlay() {
	Super::BeginPlay();
	if (APlayerController* PlayerController = Cast<APlayerController>(Controller))
	{
		if (UEnhancedInputLocalPlayerSubsystem* Subsystem = ULocalPlayer::GetSubsystem<UEnhancedInputLocalPlayerSubsystem>(PlayerController->GetLocalPlayer()))
		{
			Subsystem->AddMappingContext(DefaultMappingContext, 0);
		}
	}
}
'Unreal Engine 5 > 강의' 카테고리의 다른 글
| [UE5] 애니메이션 - 캐릭터 애니메이션과 몽타주를 이용한 연속 공격 (0) | 2024.12.03 |
|---|---|
| [UE5] 캐릭터 움직임 - 캐릭터 컨트롤에 대해 (0) | 2024.11.29 |
| [UE5] 언리얼 오브젝트 관리- 직렬화, 패키지 (0) | 2024.11.27 |
| [UE5] 언리얼 컨테이너 라이브러리 - Struct와 TMap, 언리얼 메모리 관리 (0) | 2024.11.25 |
| [UE5] 언리얼 컨테이너 라이브러리 - TArray, TSet (2) | 2024.11.22 |
